How to Display Your LEGO Minifigures Like a Pro

What You'll Learn About Displaying LEGO Minifigures
This guide covers everything from choosing the right display case to arranging figures for maximum visual impact. Whether you've got ten prized minifigures or three hundred, proper display techniques protect the investment and turn a scattered collection into a gallery-worthy presentation. Dust damage, UV fading, and chaotic arrangement plague collectors who don't plan ahead. You'll walk away with specific product recommendations, arrangement strategies, and maintenance routines that keep figures pristine for years.
What's the Best Way to Protect Minifigures from Dust and Damage?
The best protection comes from enclosed display cases with UV-filtering acrylic or glass fronts. Open shelving looks great for about a week—then dust settles into every crevice, and you'll spend Sunday afternoons with cotton swabs cleaning between cape folds and helmet vents.
Closed cases aren't just about laziness (though that's a nice bonus). LEGO minifigures, especially older or rare ones, suffer from plastic degradation when exposed to oxygen, light, and handling. The ABS plastic LEGO uses is durable, but printed details—faces, torsos, leg designs—can fade or crack over time.
Here's the thing: not all display cases are equal. The IKEA DETOLF remains the gold standard for budget-conscious collectors. At around $70, this glass cabinet offers four shelves, a clean look, and enough space for 60-80 minifigures in standard cases. The glass doors seal reasonably well against dust, though they're not airtight.
For serious collectors, Wicked Brick makes custom acrylic cases designed specifically for LEGO. Their wall-mounted displays run $40-80 depending on size, and each includes individual minifigure stands. The acrylic is UV-resistant, which matters more than you'd think—sunlight through a window can bleach a valuable minifigure's printing in months.
Don't overlook the Acrylic Display Case by Minifigure Display (available on Amazon). These stackable units cost $25-35 each and hold 16 figures. The magnetic front panels make rearranging simple, and the crystal-clear walls don't distort colors. Worth noting: buy cases from the same manufacturer if you plan to stack—mixing brands leads to wobbly towers.
How Should You Arrange Minifigures for Visual Impact?
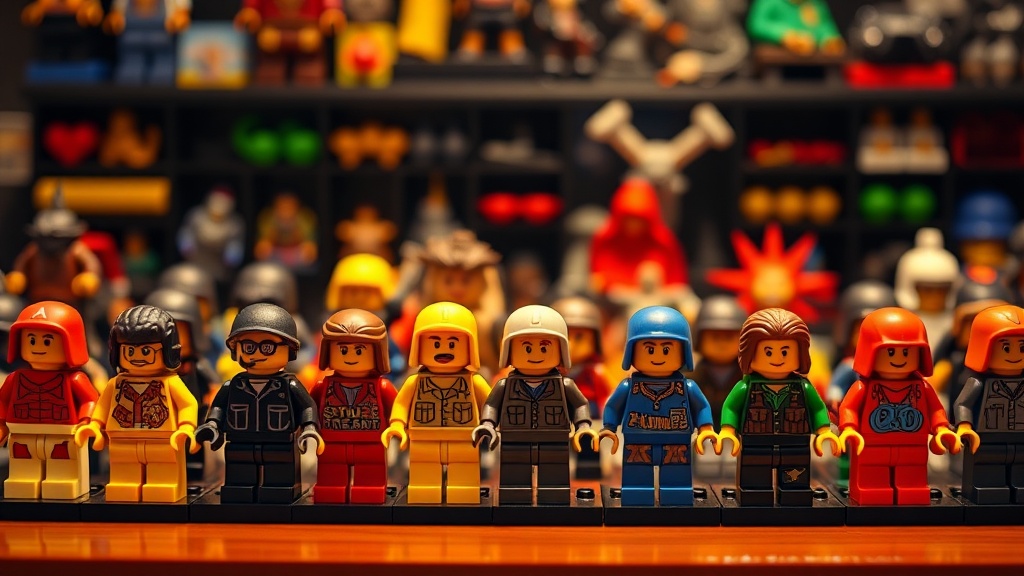
Group figures by theme, color, or era rather than scattering favorites randomly. The human eye seeks patterns, and a cohesive arrangement transforms a cluttered shelf into something that draws people in.
Start with the "hero shot" principle. Place the most striking figures—maybe that Mr. Gold from Series 10 or the Cloud City Boba Fett—at eye level where they catch attention first. Build supporting groups around them. A Star Wars collection gains impact when arranged by trilogy: Original Series on the middle shelf, Prequels below, Sequels above. The visual rhythm tells a story.
Height variation prevents monotony. Use LEGO brick-built risers (2x4 plates stacked in back, 2x2 in front) or acrylic steps from BaseAce to create depth. This isn't just aesthetic—it lets you see every figure without moving others aside. Nobody wants to knock over twenty minifigures just to admire the one in back.
The catch? Overcrowding kills the effect. Each figure needs breathing room—about half an inch on all sides minimum. Crammed figures look like a toy box, not a collection. If space is tight, rotate displays seasonally rather than squeezing everything together.
Consider these arrangement approaches:
- Thematic grouping: All Castle figures together, all Space figures together—creates instant visual coherence
- Color gradients: Arrange by dominant color (red to orange to yellow) for an ombre effect that photographs beautifully
- Chronological: Shows the evolution of printing techniques and design philosophy across decades
- Scene-based: Build small vignettes—Cantina bar, Hogwarts Great Hall—that contextualize the figures
That said, don't be afraid to break your own rules occasionally. A single Star Wars figure among Castle knights creates a fun Easter egg for observant visitors.
What Lighting Works Best for LEGO Displays?
LED strip lighting with a color temperature between 4000K-5000K shows true colors without heat damage. Warm bulbs (2700K) cast a yellow tint that makes white bricks look aged and blue bricks appear greenish. Cool daylight LEDs render colors accurately while staying cool enough to touch.
Avoid halogen or incandescent lighting entirely. The heat output warms the display case, accelerating plastic deterioration and potentially softening cheap acrylic stands. Plus, they drink electricity like a college student drinks coffee.
The Philips Hue Lightstrip offers adjustable color temperature and brightness, controlled via app. At $80 for a 2-meter strip, it's not cheap—but being able to dial in perfect lighting for photography or mood is worth it for serious displays. For budget options, Govee LED Strip Lights ($15-25) provide decent color rendering and include dimmers.
Position lights at the front edge of shelves, angled back toward the figures. Top-down lighting creates harsh shadows under hats and helmets. Front lighting fills in details and makes printing pop. Some collectors install lights on every shelf; others use a single overhead strip and accept some shadows. Your call.
Here's a quick comparison of popular lighting options:
| Product | Price | Color Temp | Heat Output | Best For |
|---|---|---|---|---|
| Philips Hue Lightstrip | $80 | Adjustable 2000K-6500K | None | Serious collectors, photography |
| Govee LED Strip | $20 | Fixed or RGB | Minimal | Budget builds, color experimentation |
| LEGO Lighting Kit (third-party) | $35 | 5000K | Low | Integrated displays, vignettes |
| Puck lights (battery) | $15/4-pack | Varies | Low | Temporary setups, renters |
Handling and Maintenance Best Practices
Clean figures before they enter the display. Skin oils transfer easily to plastic and attract dust like a magnet. Use a soft makeup brush—the kind with natural bristles, not synthetic—to dust displayed figures monthly. For stubborn grime, a slightly damp microfiber cloth works, but dry thoroughly before returning to the case.
Never use compressed air. The force can knock figures off stands, and the propellant chemicals sometimes leave residue. A small handheld vacuum with a brush attachment (on low suction) removes dust from case corners without disturbing arrangements.
Rotation prevents uneven fading. If one side of the display gets more light, swap figure positions every few months. This sounds obsessive, but rare minifigures can develop noticeable color differences between sun-exposed and shaded sides within a year.
Accessorizing Your Display
Background matters. A plain white or black backdrop makes colors pop; busy wallpaper competes with the figures. Poster board from Michael's ($3 per sheet) works fine—cut to size and tape to the back of the case. For a premium look, acrylic mirror sheets ($10-15) create depth and reflect light, though they show fingerprints mercilessly.
Labels elevate a collection from "toys" to "curated exhibit." Small stands with printed names and years help visitors (and the collector) identify figures at a glance. Brick Architect sells printable label templates, or design your own in Canva. Keep typography simple—sans-serif fonts, 8-10pt size, black on white for readability.
Worth noting: some collectors avoid labels for a cleaner look. That's valid. But if you ever plan to sell pieces, having documented provenance helps. A simple spreadsheet works— photograph each figure with its label, note purchase date and price, store in cloud backup.
How Much Should You Spend on Display Infrastructure?
Budget $5-15 per minifigure for quality display and protection. A $50 rare minifigure in a $3 case makes no sense—you're risking the asset to save pocket change. Conversely, covering a $2 common figure in a $10 custom case is overkill unless it's sentimental.
Start with the collection you have, not the one you dream of. Three quality cases beat ten cheap ones that yellow and crack. Prioritize the most valuable figures for premium protection; common figures can wait in storage bins until the collection expands.
The display journey never really ends. New acquisitions arrive. Tastes evolve—maybe that Marvel phase passes and Japanese ninjas take over. The best display systems adapt. Modular cases, adjustable shelving, and consistent maintenance routines keep the hobby joyful rather than burdensome. Build something that sparks happiness every time you walk past it. That's the whole point, isn't it?
Steps
- 1
Choose the Right Display Case
- 2
Arrange by Theme or Color
- 3
Add Proper Lighting